
GET ACCESS TO OUR AMAZING BLOG DIRECT TO YOUR INBOX
Get industry updates, tips, guides, training documents, white papers and much more direct to your inbox.
WordPress SEO checklist
So, here we go. You did your research. Wrote kick-ass content. You know which keywords you want to rank for and you used them while writing the content. Now it’s time to publish this bad boy and see the traffic come in. Right? Sorry to disappoint you, but you will have to use a good chunk of your time more before your content is ready to be published.
But don’t worry just yet. I’m going to show you how I publish content using WordPress and give you tips for every step of the way. And what better way to do it than using this very article.
I would like you to download and install the Yoast SEO plug-in in case you do not have it already. It is an extremely helpful plug-in that will help you optimize your WP website. For now, the free version will cover all your needs. After installation you will find the Yoast SEO window under your post.
Let’s begin. Make a new post in WP, copy paste your content into the visual editor box and your title into the title box.
(Since this guide is meant for SEO beginners, we will only use the visual editor and ignore the text editor for now. When you master all the steps in this guide, make sure to check how your WP post can benefit from using the text editor.)
1. The title
The title will be displayed in the style of Heading 1. An H1 tag will be assigned to it and give it the highest position in the content hierarchy. There should not be more than one H1 tag in your post.
The one thing you should remember when optimizing the title is that you use your primary keyword and put it as close to the beginning as possible.
Title optimization checklist
✔ Uses primary keyword
✔ Keyword placed at the beginning of the title
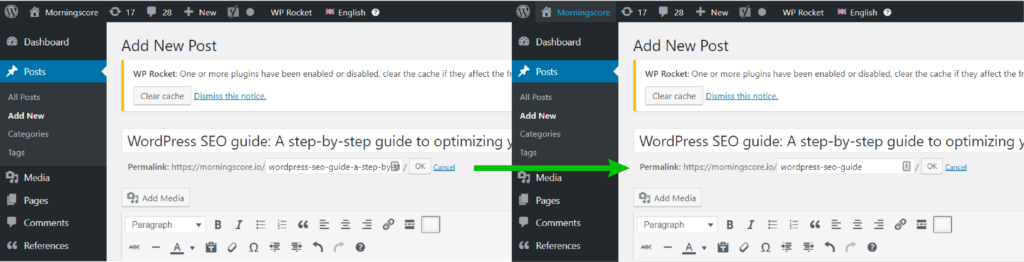
2. URL name
Right under the title, you will see the permalink. This is what the URL or your article’s web address will look like.
The more readable your link is, the better. Numbers and complicated strings of letters and signs are very hard to remember, and they tell nothing about the content. The URL should be descriptive and short, use hyphens (dash) for word separation and have a connection to the title.
Now don’t shove the whole title into the URL just yet. Use a grain of salt and take just the essence of it, the most important part. This will most likely be the part that already mentions your keyword.
URL optimization checklist
✔ Short and descriptive
✔ Uses hyphens to separate words
✔ Includes primary keyword
✔ URL matches the title (when possible)
3. Styling
Now it’s time to style the content. When you copy paste your content into the visual editor, the way it looks will depend on how you have styled it in your word processor so far. For MS Word users, if you use the default styles (Normal, No Space, Heading 1, Heading 2, Heading 3…), WP will keep the assigned Headings, but the font, its size, and color will depend on your WordPress theme.
If you style your text manually, changing the size of the font and using typographical emphasis like bold, italics or underline on your headlines, WP will assign the whole lot the Paragraph style.
Using the first scenario will save you some time. But, if you formatted your text manually without using Styles, you will need to remove all the typographical emphasis first or each article you publish might end up looking different.
Now to get to the whole point and why this is important for SEO.
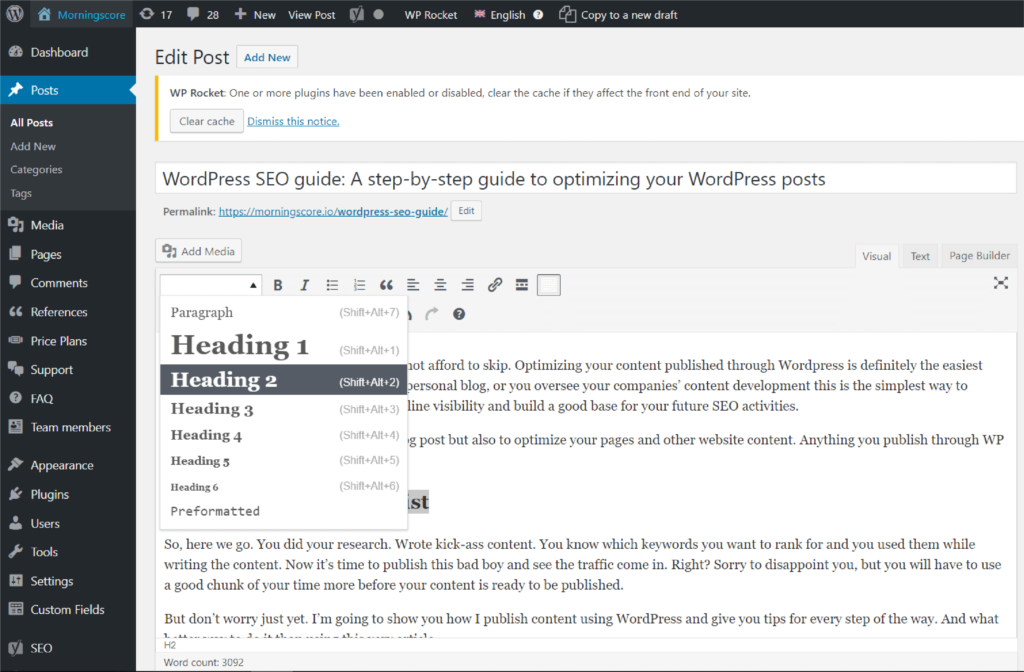
Your content needs to use various headings to map out the hierarchy. Heading 1 will be used for your title and you should never use more than one. The next headings you use in the text itself should always be Heading 2 and any subheadings in this section should be Heading 3 and so on.
In terms of font size, the H1 will always be the biggest and any subsequent heading will be smaller in size. But! Headings are not to be used to set font size. Their only purpose is to determine content hierarchy and provide structure, both for the reader and the search engine bots. So, you should never skip (for example) Heading 2 and use Heading 3 instead because its font size messes with the aesthetic of your web page.
Last but not least – keywords! Headings are another one of those places where you should use keywords. Try not to be too repetitive when using them in headings or anywhere else for that matter) or you might risk being flagged for keyword stuffing.
Styling checklist
✔ Only using one Heading 1 (and that one is the title of the WP post)
✔ Using the headings in order, without skipping (H1>H2>H3>H4)
✔ Headings contain keywords
4. Readability
One of the easiest methods of increasing reader engagement is by improving readability. Reading your article should not be a chore, so avoid the wall of text or risk putting a strain on your reader who will probably rather leave than read what you published.
First, think of where your audience will be reading your content. Reading a book and reading from a screen are two different things. The bigger the screen, the bigger the problem really, as it can be very frustrating to follow the text stretched on a big display.
The first thing you should do is section your text into small easily digested chunks.
You already have a head start by using headings. They greatly improve readability too, because they make the text skimmable.
Now take one step further, read through your content again and press enter each time you end a point. This could be just one sentence but ideally shouldn’t contain more than 150 words altogether. Although I prefer my paragraphs much shorter than 150 words and think they are easier for the eyes to track.
You probably think all these rules are crazy and hard to adhere to. After all, what are we supposed to do? Count each word to make sure it’s not too long? Of course not. That’s what plug-ins are for. ?
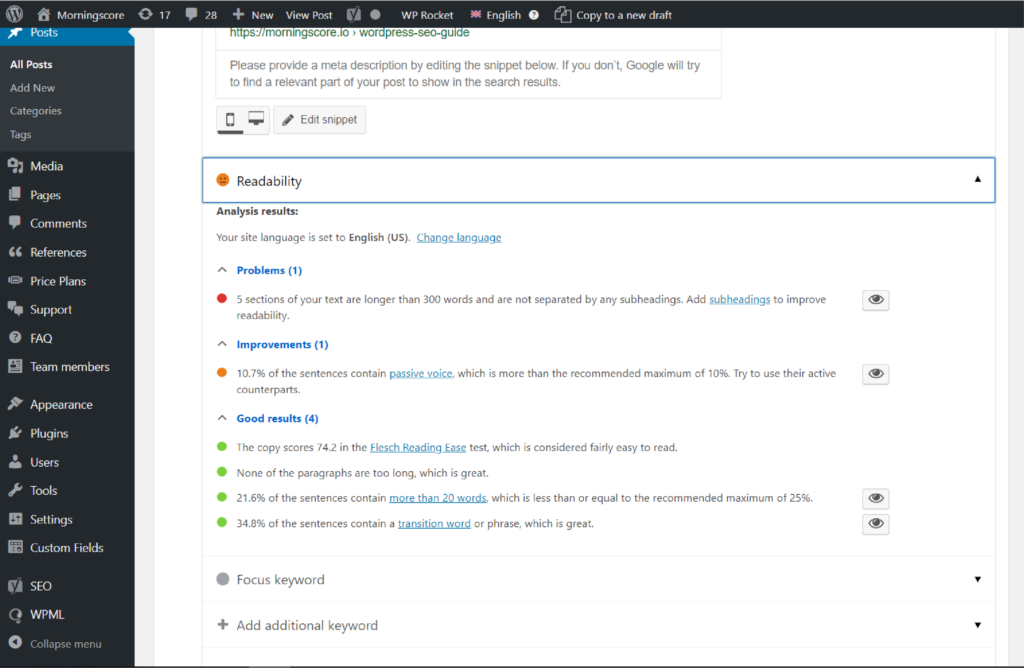
You can use Yoast’s readability analysis to see how your content scores. It will also provide a list of problems that you might want to address. Usually, you will have to divide some sections that are too long, add some headings, reduce the size of sentences and so on.
Why do I say “Might want to…”? Because this is a program and cannot completely understand the nuances of natural language. So just because it says that you have too many sentences that have over 20 words, you shouldn’t go chopping them up willy-nilly just to get the readability icon to turn green. Use it as a guideline, same as this and any other tutorial article you find online and make your copy as natural as possible.
Last on this list is – use images. They will give a well-needed resting point to the reader. A change of scenery like this engages the brain and makes sure that the content doesn’t become monotonous. I try and add at least one image every 300 words or so.
Readability checklist
✔ Using Headings to create skimmable sections not longer than 300 words
✔ Content divided into smaller paragraphs
✔ Used Yoast readability analysis and fixed as many issues as possible
✔ Using images
5. Images
Let’s face it. By stepping into the digital era, humans have become very image-centric. The internet has shifted from textual to visual in the last 2 decades and including high-quality images in your content might be more important than you’ve ever imagined.
Images grab attention, improve the appeal of your website, increase sales and user engagement. Do you really need any more reasons to include them?
But, uploading an image and sticking it into a WP post is not even half of the job. You need to take certain steps to optimize them, so they improve the relevance of your article and (very important) do not reduce the performance of your web page.
First things first. Change the image name. Make it descriptive and use hyphens as word separators. The name should reflect both what is on the image and what is going on in the section of the article where it will be uploaded. And ideally should contain one of your keywords.
Simple, huh? Stop eye-rolling at me and let me explain it more.
To make things easier, read the section (or just the heading of the section if there is one), find an image based on the first association that comes to your mind and name it with the keyword from the heading/section, preferably long-tail.

Next thing on the list is the size. Images take the bulk of a website’s size and can put a serious kink in the performance. Loading speed is taken very serious by both Google which uses it as a ranking factor and by the users that do not have the patience to wait for a page to load its monster-sized images.
Part of the problem can come from choosing the wrong format. The two most common formats are PNG and JPEG. Size-wise PNG will be bigger than JPEG because it is a lossless file format. PNG is used for drawings, graphics, and text, while JPEG is a better choice for photography. Using JPEG can reduce the size of the image by 25% without the user noticing the change in quality. So before continuing to the next step, make sure you chose the right format.
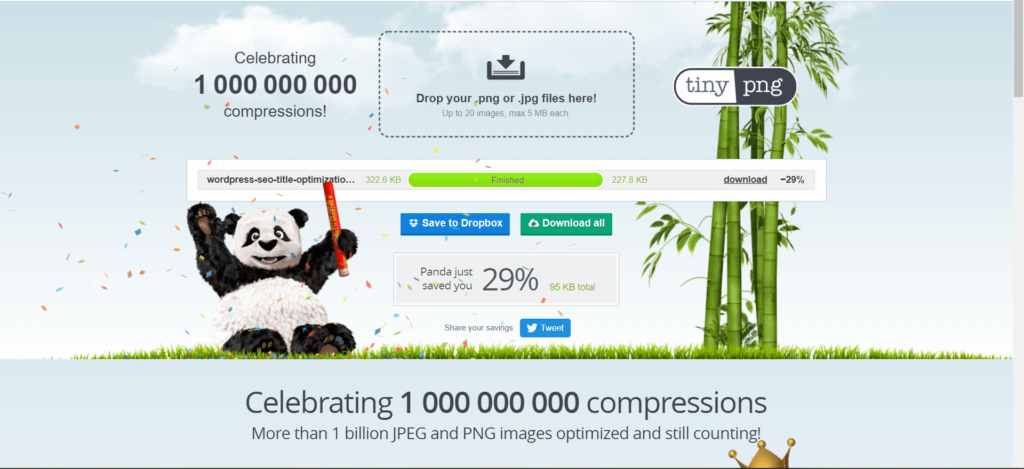
And this is what I do next. Go to Tinypng.com and upload your image there. Wait for the panda to throw the confetti and then download your nice tinyfied image. You can even do it in bulk.
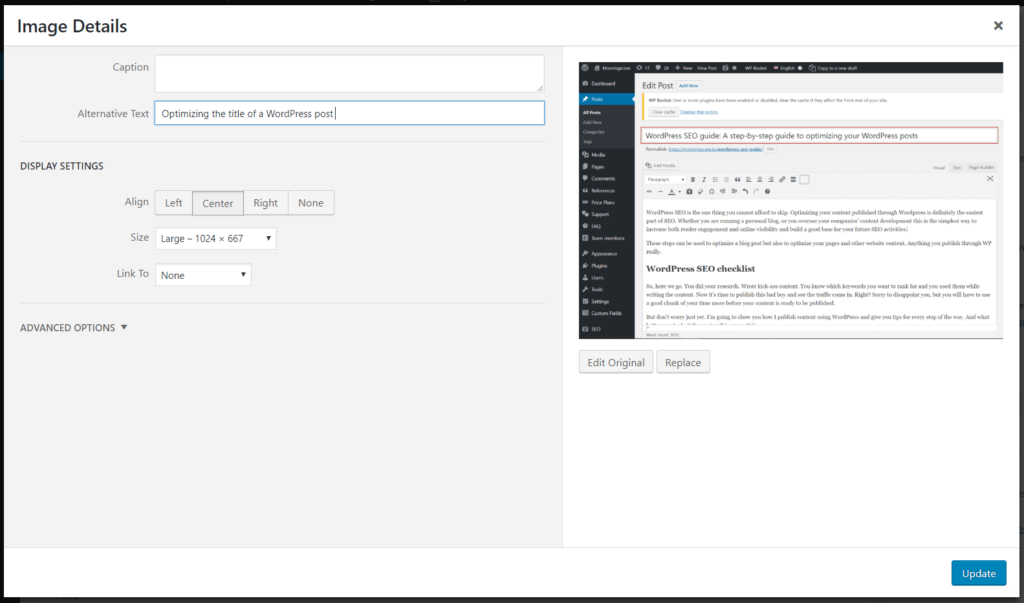
When uploading your image to the WP media folder, the one thing you are not allowed to forget is adding the alt text. The point of the alt text is twofold. It improves content relevancy for the crawlers that use the alt text to understand the connection between the image and the text. And it improves accessibility for people with impaired vision. Since they cannot see the image, their screen readers read out the alt text instead.
The last thing I will mention regarding images is the featured image. Now you might or might not have this set up in your WP. But if you do it is usually the image that is placed somewhere around the title (before or after) and/or used as the image in the link preview box. Since it is so closely connected to your title and URL, I would recommend using your primary keyword in the name and alt text.
Image checklist
✔ Chose the right file format (PNG or JPEG)?
✔ Using a descriptive name with hyphens separating the words
✔ Image size has been compressed
✔ Alt tag added
✔ Keywords included in image name and alt tag
✔ Featured image contains the primary keyword
6. Links
Links are an important part of SEO. They give your content credibility, show that you did some research or already wrote about this subject and have some supporting knowledge. They also help direct your reader where to go next, giving you a bit more control over their experience and journey.
There are two types you should use in your content – internal and external.
Internal links
Internal links will connect the content you are working on now to other web pages of your site. They are a good way to both encourage your readers to explore your website more and give the content you are working on more authority and support.
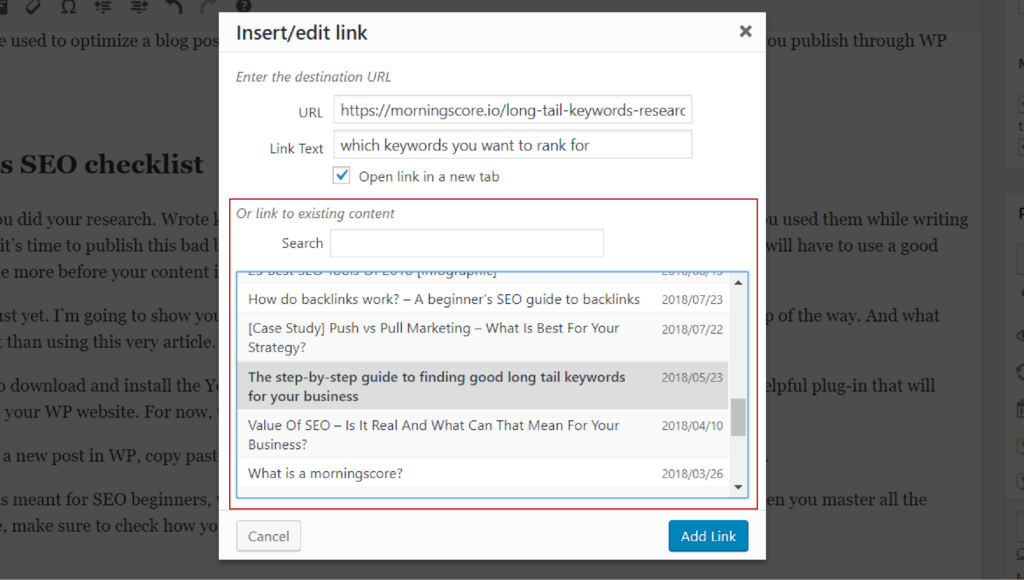
Internal links can be placed in the main text itself, linking to web pages where an idea or term is explained further. Or they can be placed before or after the main text as a suggestion to what the reader should know before he starts reading your article or where to continue after.
WordPress even makes things easy for you by letting you link to existing content in the Link options window.
External links
Legitimate sites usually have links going to authority sites. Make sure your pages link to a few authority sites which will add to their credibility in the eyes of Google.
No matter what kind of a link it is, you should always set them to open in a new tab. You do not want to navigate your visitor away from the web page they were on but give them a gentle nudge in the right direction.
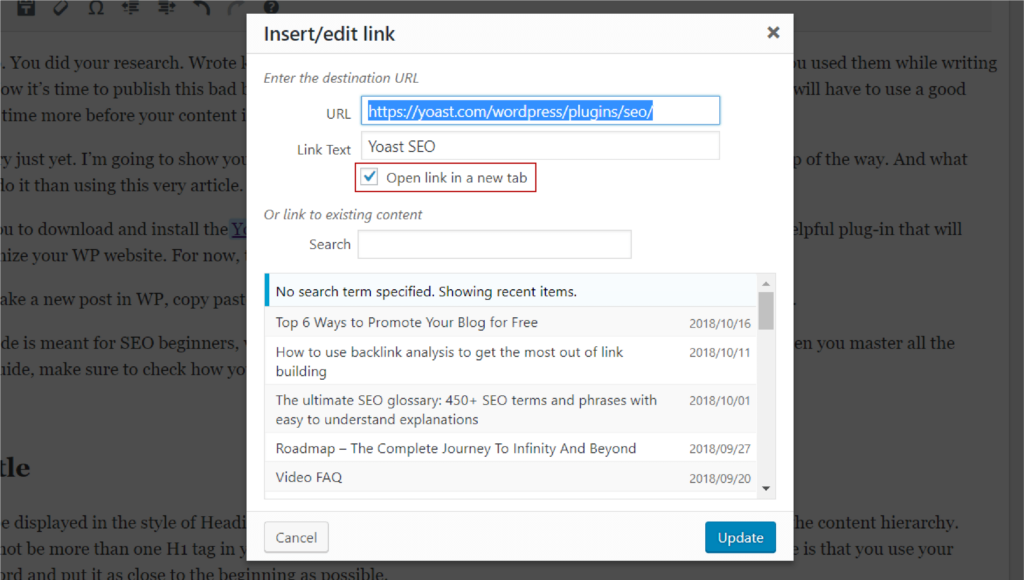
Just to complicate your life even further, let’s throw anchor text into the mix. Anchor text is the clickable part of your content that has a link connected to it. And the number one rule here is – do not use only the keyword of what you are linking to as the anchor text (too often). Google thinks it’s spammy. You can use generic anchor text like “Click here”, brand name or a combination of a keyword and brand name, pure naked URL or best yet whatever fits the text most naturally. For links where you suggest where the visitor should go next, you can also use the page or article title.
The last thing I will mention regarding links is the dofollow or nofollow. The only reason I am bringing this up is in case someone asks you one day to make sure that the link placed in your content is dofollow. Dofollow is the default setting of a link and means that the search engine crawlers will follow where it goes and pass link equity to the website it leads to. But this is a whole other ball game and something for you to research when you feel you are ready for the advanced side of SEO.
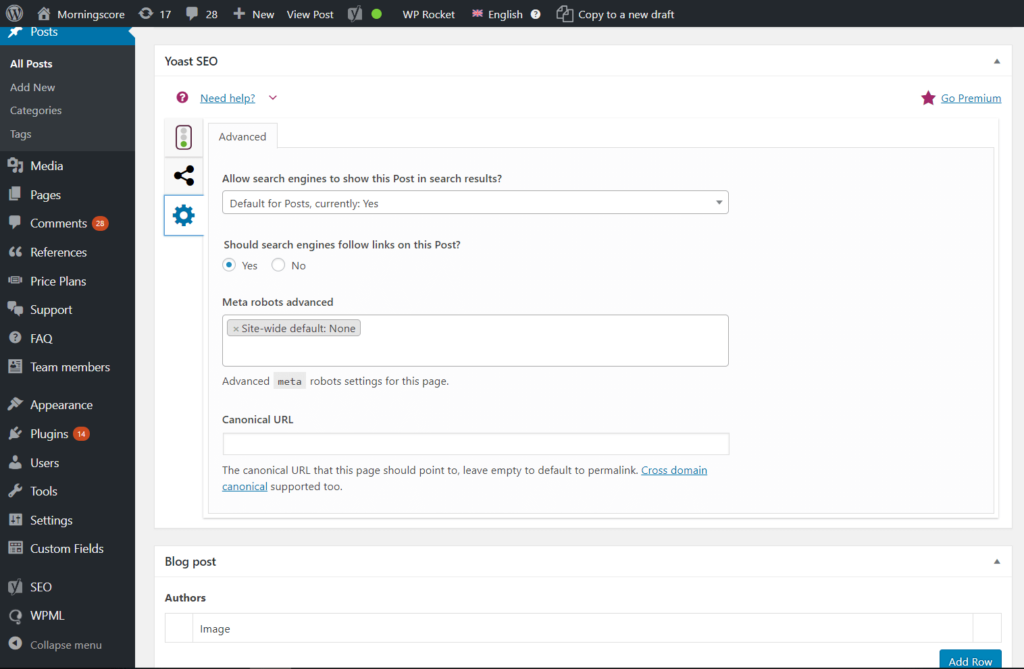
You can make sure the links are dofollow by going to Yoast SEO’s advanced tab and check if the “Should search engines follow links on this Post?” is set to Yes.
Links checklist
✔ Have at least 2 internal links
✔ Have at least 2 outbound links
✔ Links are set to open in new tab
✔ Anchor text fits naturally in the text
✔ Dofollow or nofollow links?
7. Snippet title and description
Next up is optimizing the snippet that will be displayed in the search engine result pages.
You will find the snippet preview in Yoast SEO’s content optimization and it’s here where you can edit it too.
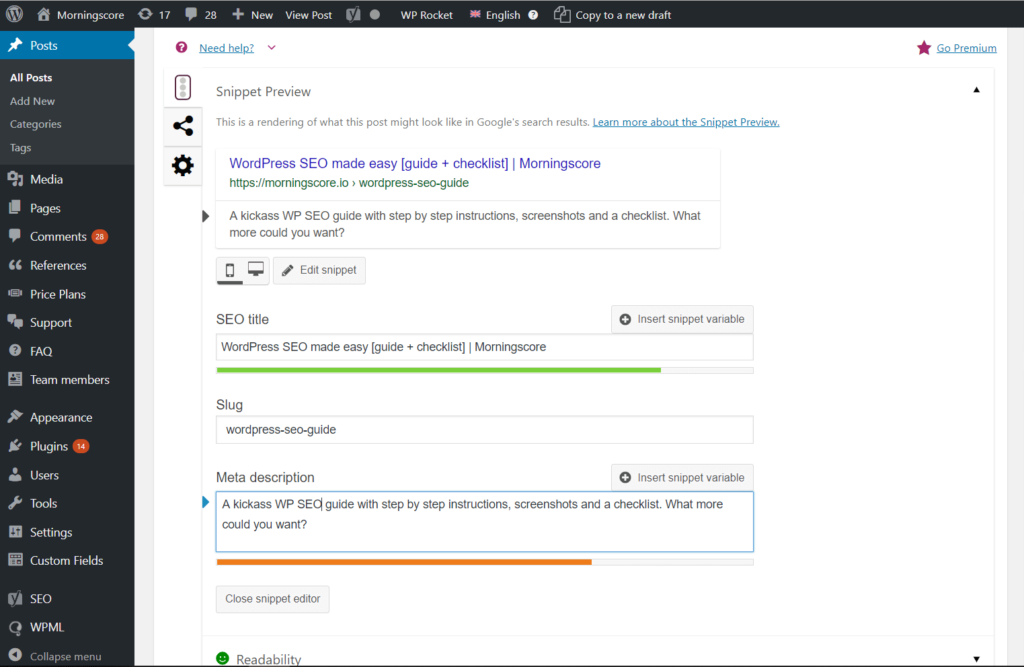
Both the title and description are a perfect SEO opportunity to use your primary keyword, but keep in mind not to write it just for the search engine crawlers. This snippet is your free ad that will attract new visitors. Your main goal is to get them to click on it. Your second goal is to not disappoint them, so make the description accurate and true to the content it leads to.
There is quite a bit of discussion talking about the ideal length of the title and description. Most online advice talks about the number of characters. And staying within a certain character range. I find this advice confusing and unhelpful because it requires too much experimentation from my side.
I also ignore the color that Yoast flags my snippet with and use the Metatjekker tool instead.
By doing an audit of how all the titles and descriptions Morningscore’s website uses look like on desktop and mobile, I have found that Bondtofte’s Metatjekker tool is extremely accurate at predicting the appropriate length.
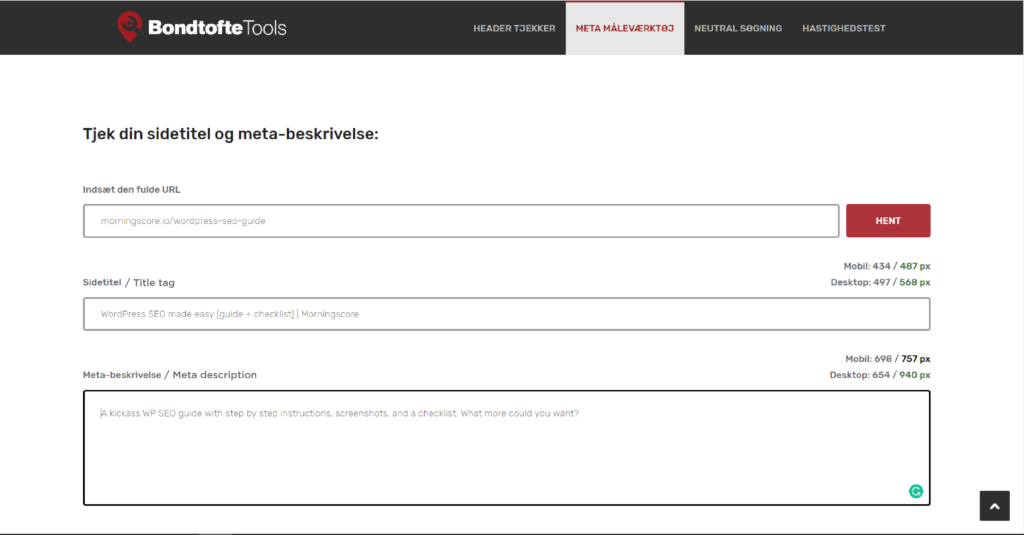
The tool is in Danish, but honestly, it’s so straightforward that you really don’t need to understand Danish to be able to use it.
As you cannot set separate title and description for desktop and mobile, I optimize them for mobile. It sacrifices a few characters but kills two flies with one stone.
The same title and description will be used in Facebook and Twitter when anyone posts a link to this WP post. If you would prefer to set it to something else, you can do it by adding a separate title, description, and image for use in social media by using the Yoast SEO’s social tab.
Snippet checklist
✔ Using primary keyword in both the title and the description
✔ Does it make you want to click on it in the search results?
✔ Optimized length of both title tag and meta description
8. Yoast’s content optimization – focus keyword
It’s a good idea to see what Yoast thinks of your post. It gives you a nice list of issues and a handy highlight option to help you easily find the offenders.
Scroll down to Yoast’s content optimization tab and expand the Focus keyword window.
Here you need to assign a focus keyword – that would be the primary keyword. In the free version of Yoast SEO plugin, you can only have one keyword, but that will be fine for now.
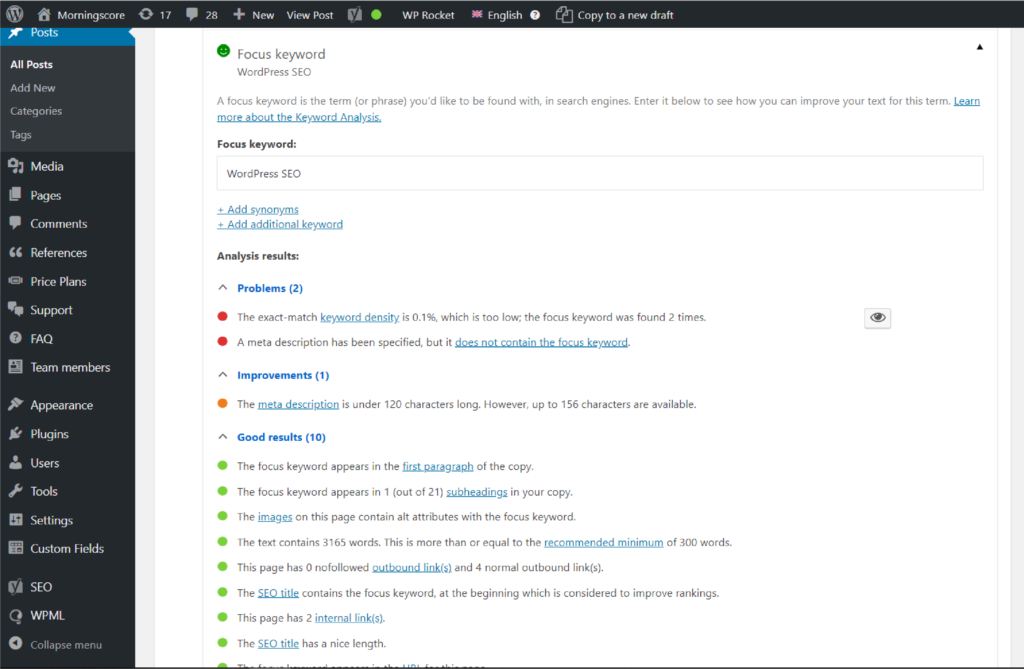
Read the keyword analysis and fix as many issues as you can again. If you did all the steps in this guide, there shouldn’t be too many.
Keep one thing in mind though. As mentioned before, Yoast should be used as a guideline, it is not by any means the law. So, if you went through all the reported issues but find that you cannot fix some of them in a way that will not affect the whole article badly, then leave it. The most important thing is that it sounds natural to your readers.
Yoast content optimization checklist
✔ Fixed all issues with the focus keyword (within reason)
9. Search engine visibility
I advise you to do this last step just to make sure that your WP post is indexable because if it’s not, your new WP post will never appear in the search engine result pages.
In Yoast SEO’s advanced tab under “Allow search engines to show this Post in search results?” set the option to Yes. Or even better Default for Posts, currently: Yes as this means that you don’t need to worry about this step in the future.
Search engine visibility checklist
✔ WP post is indexable